How Can We Help?
How to do Purchase
Purchase Entries can be made by two options
- Purchase Order -> Goods Receipt against PO
- Goods Receipt Ad-hoc (Without any reference)
A goods receipt against PO also can be made either by converting PO in Goods Receipt or creating a Goods Receipt by choosing a PO and selecting items which is usually helpful when partial goods receipt to be made against PO.
- Navigate to Purchase Order and create a new PO
- PO Navigation – Procurement – Order Management – Purchase Order
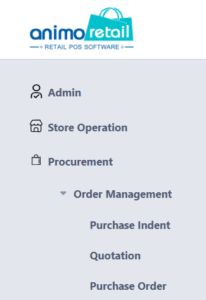
- A list will appear when you click on Purchase Order which shows by default recently made PO, filter option is available for old records
- List

- Filter


- Print / View or Edit
To print, view or edit a PO click on the Purchase Order No- A new interface appears which is view of PO with all details, there is a toolbar on top with action buttons such as EDIT, PRINT & APPROVE
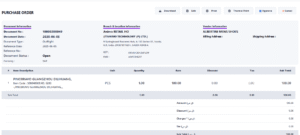
- A new interface appears which is view of PO with all details, there is a toolbar on top with action buttons such as EDIT, PRINT & APPROVE
- Please note a PO is editable until it is not approved, an approved PO is not editable
- List
- Create a PO
- Click on New Purchase Order
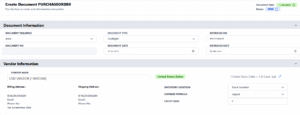
- Enter Reference Date and Reference No which can be Bill / Reference Details of Supplier Document etc.
- Select Vendor
- If it is a foreign currency (overseas) vendor, please check and edit Exchange Rate, to edit exchange rate use Pencil icon next to Ex Rate.
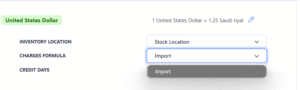
- Be cautious about Formula
At time of implementation Animo RETAIL configure multiple formulas as per requirement as some may have VAT/GST and some may not have it, some Tax Calculations may consider Additional Charges such as discount and freight too and some may not, so choose it wisely.
- Other Information
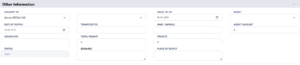
- Delivery To – if goods receipt is to be made in any branch against this PO, choose that branch
- Valid Up To – The PO is valid up to which date, as if user try to make a goods receipt after this valid date, system prevents, e.g. does not allow user to make goods receipt.
- Item Information
- Scan a barcode
- Item Help or Search by Article, incase barcode is not available.
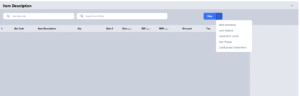
- There are some other options like
- Excel Upload –
- Excel Sheet with columns
Barcode , Quantity , CostRate, SalePrice - Excel Sheet with columns
Barcode, Quantity
- Excel Sheet with columns
- Quick Item Creation
- Item Create (Pop-Up)
- Excel Upload – Create Item
- Excel Upload –
- Scanned Item will appear in Grid
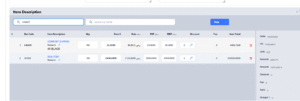
- Change the Quantity
- Change the Rate (if overseas, enter foreign currency rate and system calculates and put rate as (Rate in Vendor Currency) * Ex Rate
- If required change RSP and Listed Price (MRP)
- Discount on Item Level, recommended to use only if for every item there is a different discount to be applied
- Tax Calculation will be done automatically by system
- Once all items are scanned scroll down to summary block and enter additional charges as per requirement
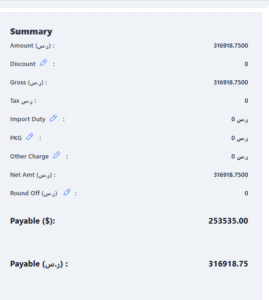
- any of these charges can be entered as amount or % To edit the charge click on Pencil icon
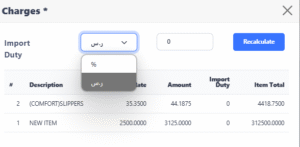
- Do note if Discount is edited here it will impact on all items and override discount entered on Item Level.
- any of these charges can be entered as amount or % To edit the charge click on Pencil icon
- Click on New Purchase Order
- Verify if all information is filled correctly save it
- Once you click on OK it will redirect to purchase order list
- PO Navigation – Procurement – Order Management – Purchase Order
- Option 1: Steps to be make goods receipt (Converting PO in Goods Receipt)
- View Purchase Order and Approve it
- Once PO is approved, a new button appears for “Convert to Goods Receipt“, click on this button and Goods Receipt will be made automatically by system
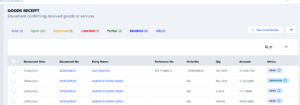
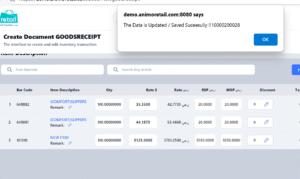
- To see the goods receipt navigate to Procurement – Transaction – Goods Receipt and see the list
- Approve the goods receipt if all is ok and only if no editing is required in future
- View Purchase Order and Approve it
- Option 2: Steps to be make goods receipt (Partial/Full)
- Until Approval of Purchase Order steps are same as above mentioned
- In this scenario do not use “Convert to Goods Receipt “
- Navigate to Procurement – Transaction – Goods Receipt
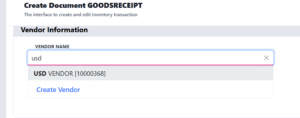
- Click on + New Goods Receipt
- Select Vendor
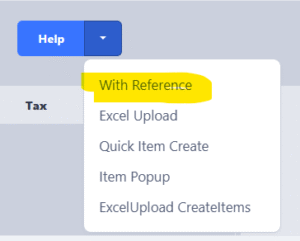
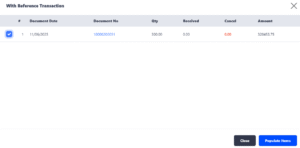
- Scroll down and click on a button next to Help in Item Grid,
Choose With Reference.
- A pop-up screen appears with list of all valid (Approved and Goods Receipt is Pending) purchase orders
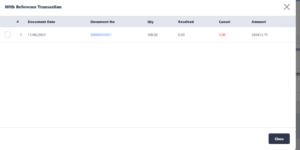
- Tick the checkbox against which PO , goods receipt is to be made and button of Populate Items will be highlighted. Click on Populate Items.
- Items populate in Item Grid along with charges and discounts as entered in PO
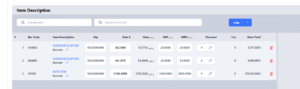
- Change or Edit information as per requirement for example if only 2 items are being receive whereas PO was made with three items, remove that item or reduce the quantity as per delivery
- Once changes are done, e.g. if quantity is reduced or item is removed or charges are edited, scroll down to summary block, verify if all is ok then simply click on Save button.
Need more help?
If you have questions or need further assistance, feel free to create a ticket https://animoretail.raiseaticket.com/ or browse our other help articles.